How to Undo Brass Nut on Top of Uploader
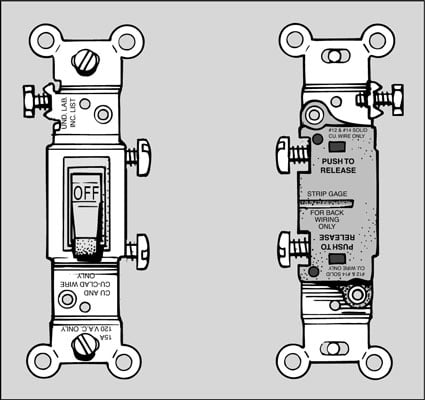
To remove these wires, insert the blade of a pocket-sized screwdriver into the slot under the hole into which the wire is inserted and button in as you pull the wire loose. Pushing the blade of the screwdriver into the slot releases the grip on the inserted wire. Hither are some descriptions of each wire and where they get:
-
The white (neutral) wire connects to the silver screw, or you place information technology in the back wire hole on the aforementioned side of the device as the silver screw.
-
The blackness (hot) wire goes to the brass spiral or into the hole in the back of the device on the same side as the brass spiral. This wire is sometimes red.
-
The green or bare copper (ground) wire, if the device has ane, attaches to the green screw terminal on the switch or to the electrical box.
Although plug-in connections may exist more convenient, they are less reliable than those with screw terminals, so don't utilize them!
Replacing single-pole lite switches
If the switch has On and Off embossed on its body and it'due south the but switch that controls lights or receptacles, it'southward a single-pole switch. To replace this kind of switch, follow these steps:-
Turn off the ability to the switch at the chief excursion breaker or fuse console.
-
Unscrew and remove the switch plate; then use a voltage tester to make sure that the circuit is dead.
-
Unscrew the switch from the electrical box and pull it out with the wires however attached.
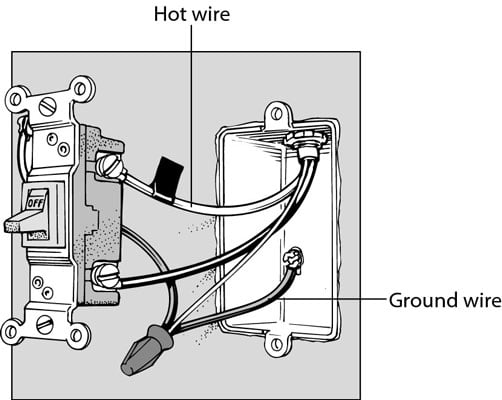
2 or three wires will be attached to the switch: an incoming hot wire, which is black; a return wire, which carries the load to the fixture and may be black, red, or any other colour except green; and sometimes a grounding wire, which is green or blank copper. At that place may be other wires in the box, but you are only dealing with the ones continued directly to the switch.
You may find a white wire that has black record on it connected to the switch. This record indicates that the white wire is being used as a blackness or colored wire in the switch leg, and so information technology's not neutral.
-
Compare your new switch with the one you're replacing to notice the corresponding locations for the electrical screw connectors.
Considering the power is off, yous tin match up the connectors the easy way: Instead of disconnecting all the wires at once and possibly getting confused, unscrew and connect one wire at a time.
-
Adhere the start wire you lot unscrew to the same-colored spiral on the new switch every bit it was on the old; do the same with the second.
To connect a wire to a terminal, strip off about 1/two inch of insulation, using a wire stripper, and twist the cease into a clockwise loop with long-nose pliers. The loop must wrap at least 2-thirds but no more than iii-quarters of the style around the last screw. Hook the wire clockwise around the screw and then when you lot tighten the screw with a screwdriver, the clockwise forcefulness of the tightening screw makes the loop wrap tighter effectually the screw.
-
Gently push the new, wired switch back into the electric box and screw it in identify.
-
Screw on the switch plate and turn on the power.
Replacing three-way light switches
A three-way switch is a handy convenience to command a calorie-free from two locations, such as at the top and lesser of a staircase. If the words On and Off aren't embossed on the switch and it's one of two switches that control a unmarried light or receptacle, you have a three-way switch. Seems like it should exist called a two-mode switch, right? The name refers to the fact that these switches have iii terminal screws.To supervene upon a three-way switch, follow these steps:
-
Turn off the power to the switch at the excursion or fuse panel.
-
Unscrew and remove the switch plate; and so use a voltage tester to brand sure that the circuit is expressionless.
-
Unscrew the switch from the electrical box and pull it out with the wires still attached.
A three-way switch has at least 3 wires, and perchance 4, depending on whether it has a ground wire. Two wires attach to contumely spiral terminals, which are usually at the top of the switch, and an additional wire attaches to a night-colored (not dark-green) screw terminal, which is usually at the bottom of the switch. Mark this third wire with a piece of tape and mark the wire on the same side of the switch directly above it with a piece of different-colored tape.
The new switch may have the electrical screw connectors in slightly different locations than the switch you lot're replacing. Most switches have a pair of terminals on contrary sides of the switch top and a single terminal at the bottom.
-
Remove the wires from the switch.
-
Adhere the tagged wires to the corresponding terminals of the new switch.
Alternatively, you may choose to transfer i wire at a time from the onetime switch to the new switch.
-
If the existing switch has a green ground wire, attach the wire to the green screw final on the new switch or to the electrical box.
-
Push the new, wired switch back into the electrical box and screw it in place.
-
Screw on the switch plate and plow on the power.
Replacing four-way low-cal switches
If the switch doesn't have the words On and Off embossed on its body and it's the center switch of three switches that control a unmarried calorie-free or receptacle, it's a four-way switch. To replace a four-fashion switch, follow these steps: 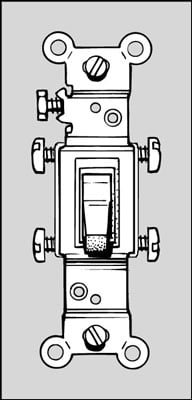
-
Plough off the ability to the switch at the circuit panel or fuse box.
-
Unscrew and remove the switch plate; then use a voltage tester to make sure that the circuit is dead.
-
Unscrew the switch from the electrical box and pull it out with the wires still attached.
This switch has at to the lowest degree four screw terminals. It may as well have a fifth, footing last (green).
-
Mark the location of the iv wires with tape so that you lot can replace them on the new switch; and so remove the wires from the switch.
Alternatively, you lot may choose to transfer one wire at a time from the former switch to the new switch.
-
Adhere the wires to the corresponding terminals of the new switch.
If the existing switch has a green ground wire, attach it to the dark-green last on the new switch or to the electrical box.
-
Button the new, wired switch dorsum into the electrical box and screw it in place.
-
Screw on the switch plate and turn on the power.
Replacing light switches with a dimmer
Replacing a standard single-pole or 3-manner switch with a dimmer switch is no dissimilar than replacing a standard switch. Remember: Dimmer switches don't work on most fluorescent fixtures, and depression-voltage lighting requires special depression-voltage dimmers.Cheque the rating of the dimmer switch you buy. Most dimmer switches can handle 600 watts of power. Count the number of light bulbs that the switch controls and add together upwards the maximum wattage seedling allowed for the fixture. For example, if the switch controls a lite fixture that accommodates up to 2 100-watt bulbs (200 watts total) a 600-watt dimmer will take no problem, but a string of 7 recessed lights could overload the dimmer.
To supercede a standard switch with a dimmer switch, follow these steps:-
Plough off the power to the switch at the excursion or fuse panel.
-
Unscrew and remove the switch plate; then use a voltage tester to make sure that the excursion is dead.
-
Unscrew the switch from the electrical box and pull it out with the wires still attached.
-
Remove the wires from the onetime switch.
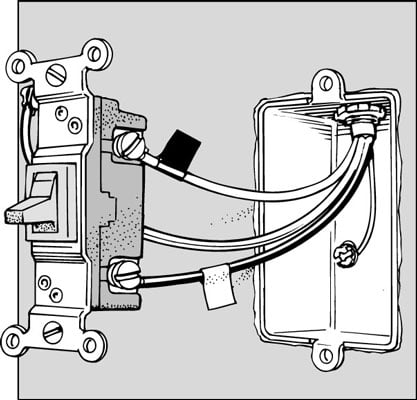
Dimmer switches are usually connected to the business firm wiring by brusk lengths of wire coming out of the switch body rather than by screw terminals.
-
Use the connectors (wire nuts) supplied with the fixture to attach the black wires coming out of the dimmer switch to the colored wires that were attached to the terminals on the erstwhile switch.

Showtime, twist the wires together, and then screw on the wire nut.
-
Push the new switch dorsum into the electric box and spiral information technology in place.
The trunk of a dimmer is larger than the switch being replaced. Don't just force it in. Oftentimes, y'all need to reposition or better organize the wires beginning to make room for information technology.
-
Screw on the switch plate.
-
Push the control knob, if there is one, onto the shaft protruding from the switch.
-
Plow on the power.
About This Article
This article can be plant in the category:
- Electrical ,
Source: https://www.dummies.com/article/home-auto-hobbies/home-improvement-appliances/electrical/how-to-replace-a-light-switch-185346/
0 Response to "How to Undo Brass Nut on Top of Uploader"
Post a Comment